These spooky Halloween pizzas are quick and easy to make with my no-yeast Greek yogurt pizza crust! Kids and adults with love this fun twist on pizza night!
With Halloween just around the corner, I couldn’t resist adding a spooky twist to our pizza night. I mean, why have a regular pizza when you can turn the same recipe into these mini Halloween pizzas?
These spooky Halloween pizzas are so fun! I played around with a few different designs and think they are so darn cute!
Us oversized children loved these and I just know that little ones will go nuts over these mini pizzas! Perfect for a kid-friendly pizza dinner before heading out for trick or treating, and even more fun to get the kiddos involved into making them!
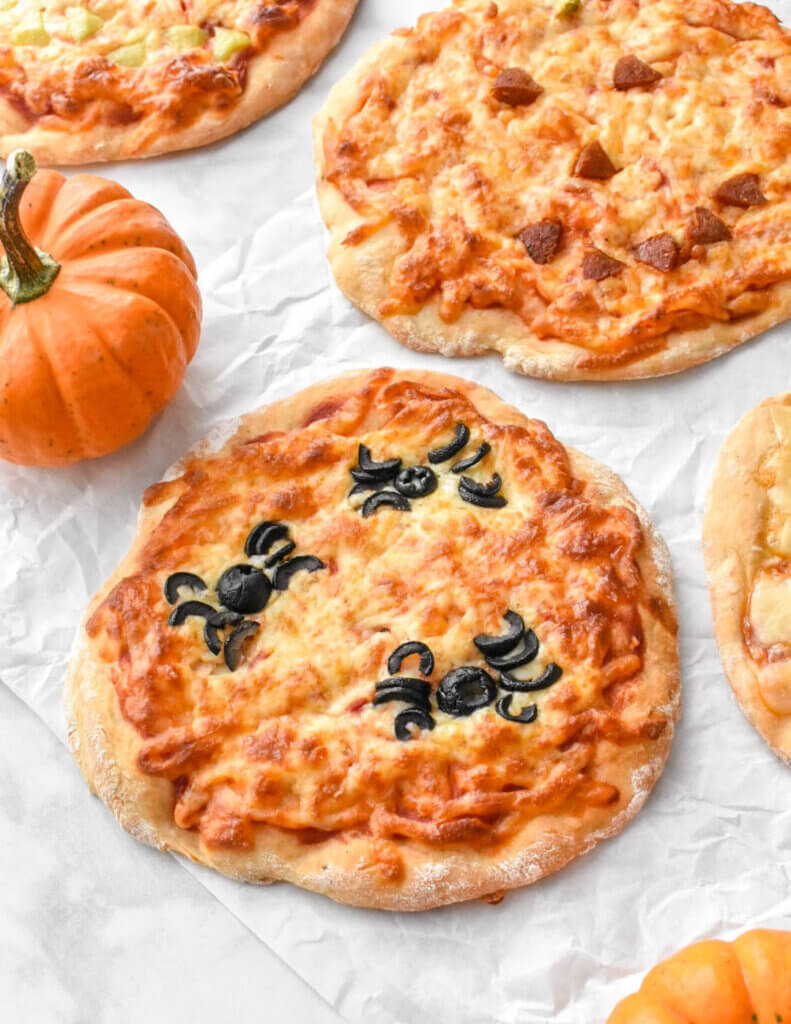
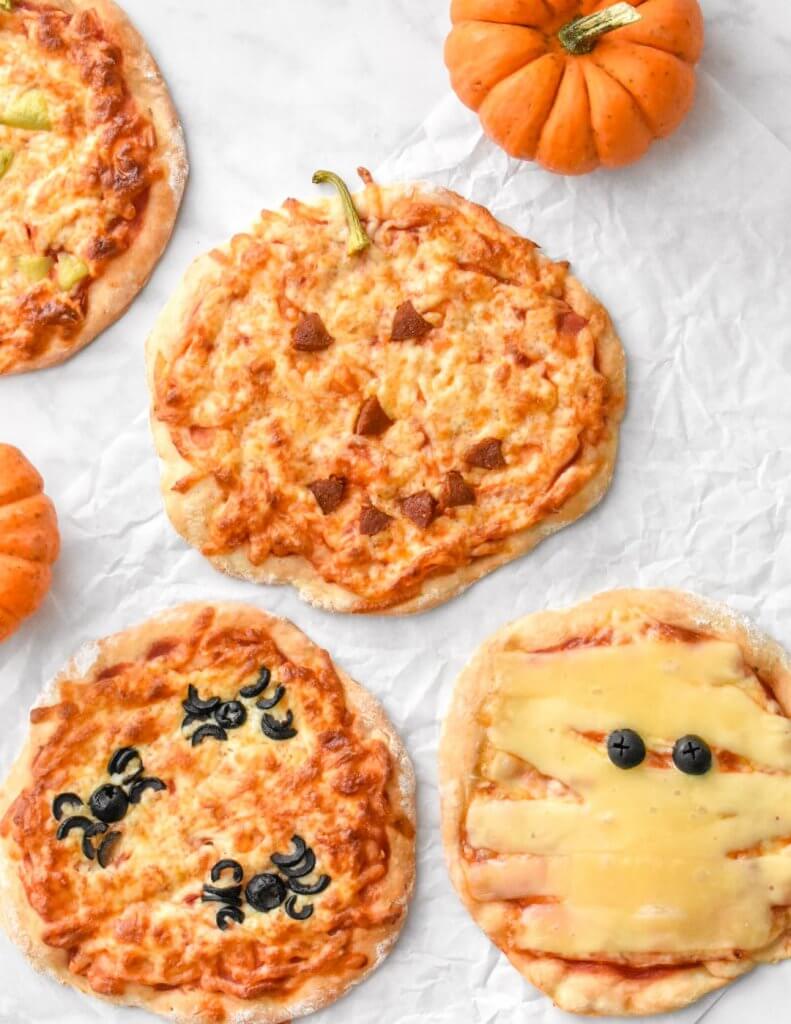
These Halloween themed pizzas are in 3 different designs. I opted for spiders, jack o’ lanterns, and a mummy. You can make a variety of designs or just stick with one. You could also switch up the toppings to suit your own preferences.
Why you should make these Halloween Pizzas
- they come together in just half an hour (start to finish)
- the quick Greek yogurt crust is so easy to make and doesn’t require any pre-planning
- they are pretty darn healthy (especially with added protein in the crust thanks to the yogurt!)
- the designs are so fun and cute
- kids will love making them and eating them
- they taste delicious! I mean, they are pizza, after all!

Fun Halloween Pizza designs
As mentioned earlier, I opted for 3 simple designs: jack o’ lanterns, spiders, and a mummy.
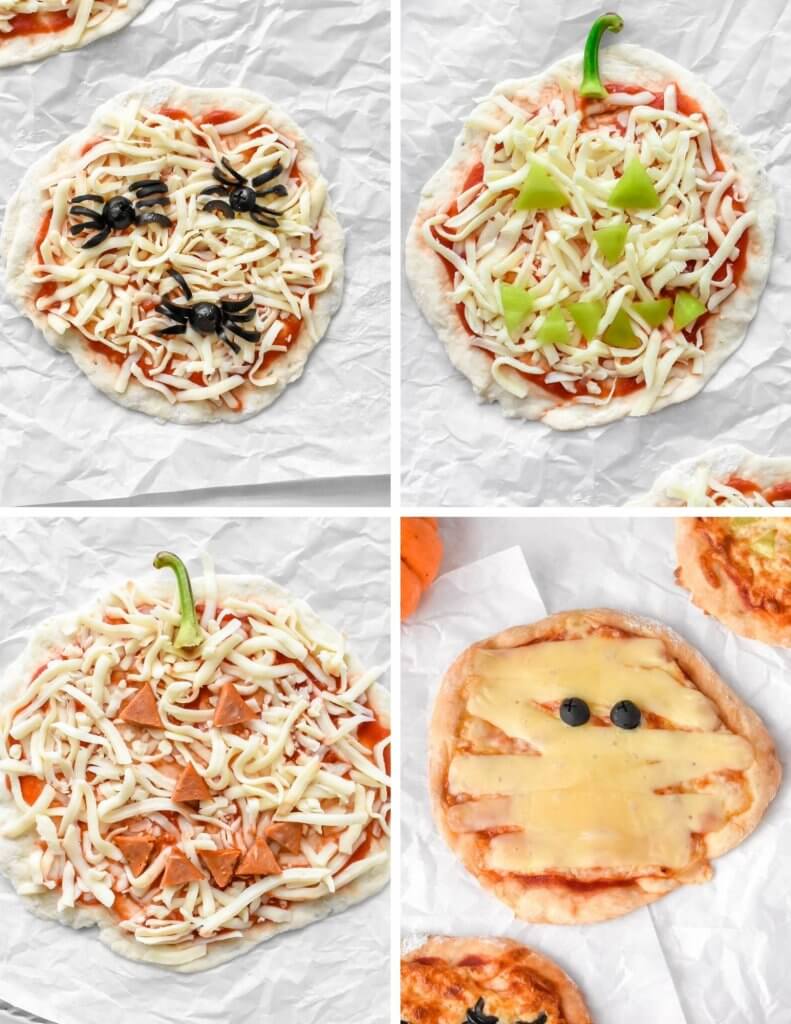
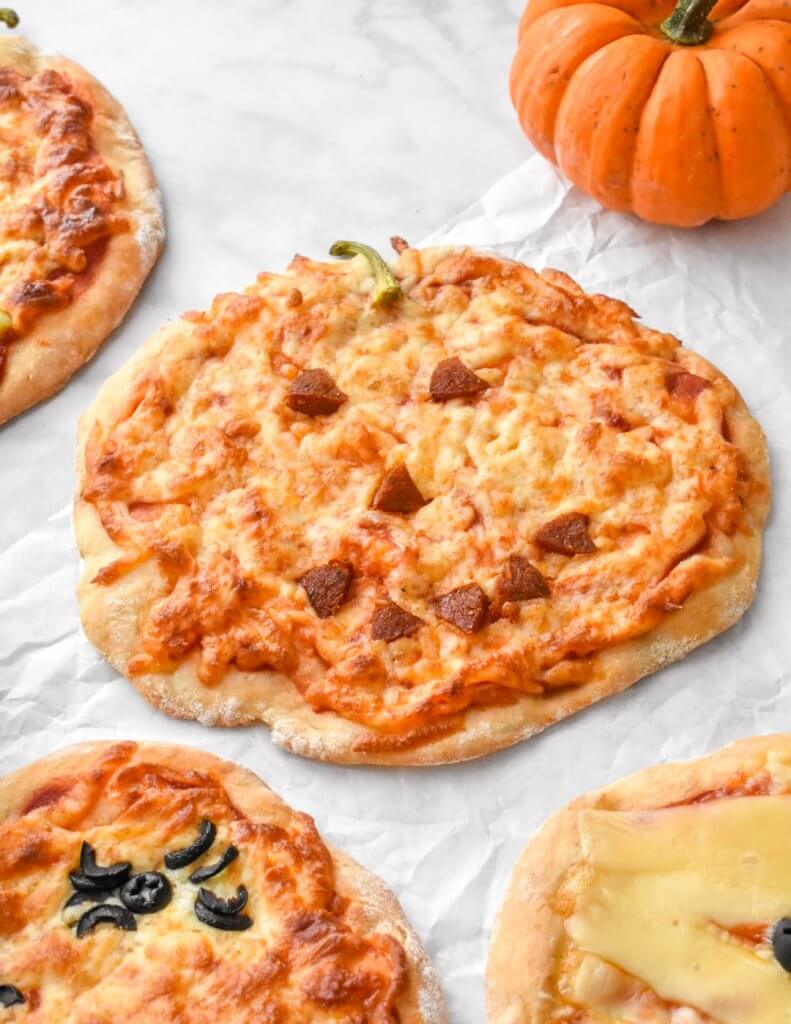
Jack o’ lantern pizzas
To decorate the jack o’ lanterns, I used pepperoni on one and peppers on the other for a vegetarian option. I simply cut the pepperoni and peppers into triangle shapes and then arranged them to form the face of each jack o’ lantern pizza. I also added the top stem of the green peppers to make a pumpkin stem. Although I just pick it off to eat the pizza, I think its a cute touch and makes them look more like a pumpkin.
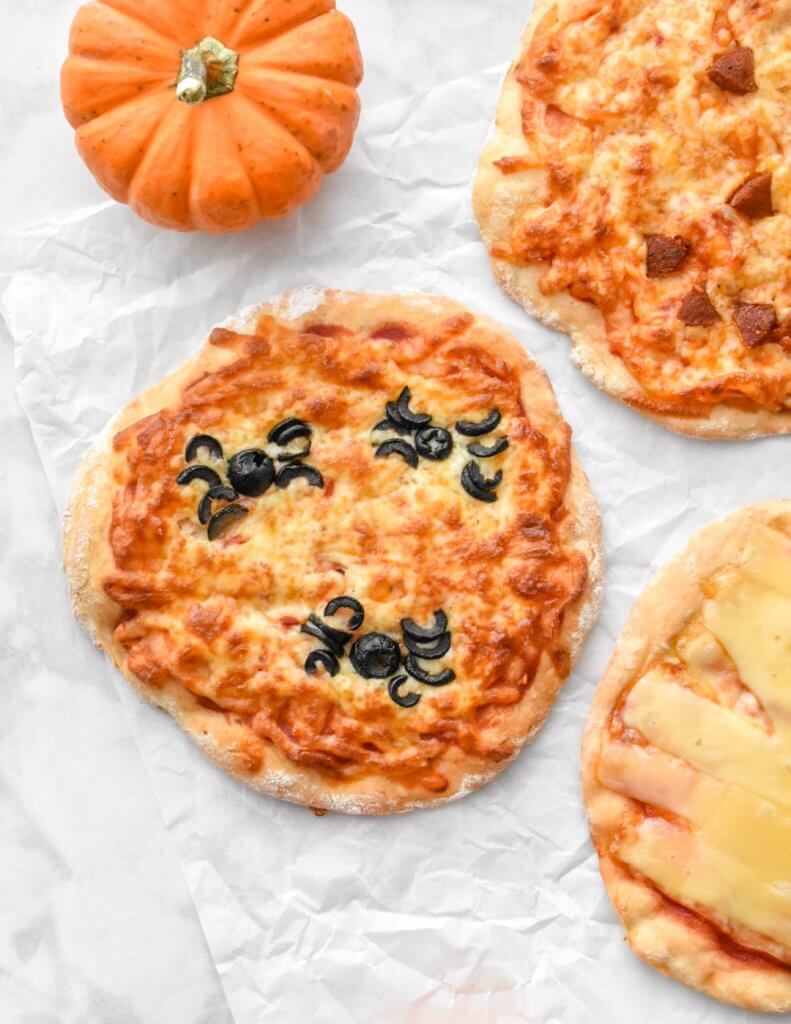
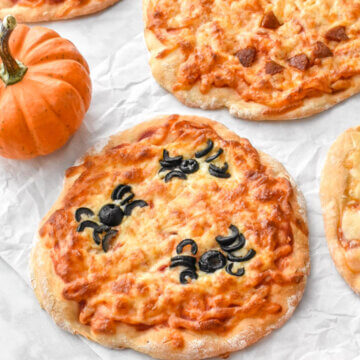
Spider pizzas
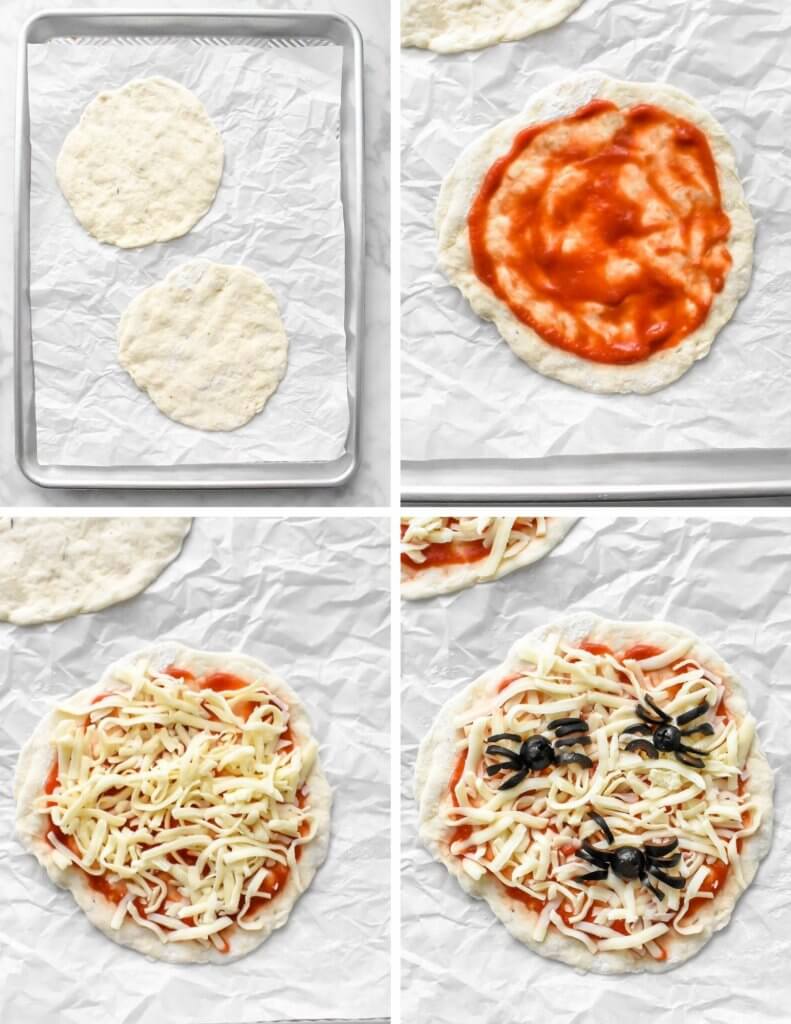
To make the spider Halloween pizzas, the only toppings I used were sliced black olives. I tried to pick out the end pieces for the spider body because I didn’t want a hole in the middle, but you don’t have to be as picky as me! The legs were just sliced olives cut in half. This pizza design took the most time cause arranging the legs close to the body took a smidge more time, but it wasn’t that hard at all.
Mummy pizzas
I love the mummy pizzas so much and they are super simple. To start, I just baked a mini cheese pizza without any design on it. Once the pizza is baked (in the last 2 minutes of baking), I took out the baking sheet, added the olive eyes and then arranged the sliced cheese slices around it. Definitely the easiest design of all 3. I forgot to take a picture of the strips and eyes before I popped the pizza back in the oven, but you can still totally tell how I placed the strips as they are still visible!
Tips for making Halloween Pizzas
The pizza crust and designs are pretty easy to do but there are some things you can do to make your life easier and get the best results with your designs.
- Use pre-shredded mozzarella. Make life easier by buying pre-shredded mozzarella or pre-shred your cheese so it is ready to go before dinner time!
- Prep other ingredients in advance as well. If you are going to be making these on Halloween night (i.e. pre- trick or treating), I recommend prepping the other pizza ingredients as well. While it doesn’t take long to cut pepperoni or peppers into triangles, it will free up more of your time so you can get the littles ready in their costumes. You can slice them earlier that day or the night before and store them in an airtight container in the fridge.
- To make the mummy, start by baking a simple mini cheese pizza. I have tried making these mummies by arranging sliced cheese and the olives on a raw dough but they just don’t turn out the way I like them. After 15 minutes of baking, the cheese is completely melted and the “mummy strips” are no longer visible. To prevent this, bake a simple cheese pizza with just sauce and shredded cheese. Then in the last two minutes of baking, add the olive eyes and slices carefully on top and bake until melted.
- Let the kiddos get in on designing their pizza toppings! Depending on the age of your kiddos, the jack o’ lantern design is probably the easiest to tackle with young ones. Kiddos can arrange the pre-cut peppers or pepperoni to form their own jack o’ lanterns faces. Kiddos can also do the spiders but will likely need some help arranging the little spider legs. [The mummy pizza is pretty easy to do too but is formed when the pizza is already baked so you may want to avoid having the kiddos near the hot pan.]
What you need to make a yeast-free pizza dough
- flour
- dried herbs (eg. oregano, basil, or thyme) for added flavour, optional
- baking powder
- baking soda
- salt
- Greek yogurt
What you need to top Halloween Pizzas
- shredded mozzarella cheese
- sliced mozzarella cheese (for each mummy pizza you do)
- pizza sauce
- pizza toppings (I used: black olives, green pepper, pepperoni)
How to make spooky Halloween Pizzas
For the pizza crust:
- Preheat oven to 425F and line 2 baking sheets with parchment paper.
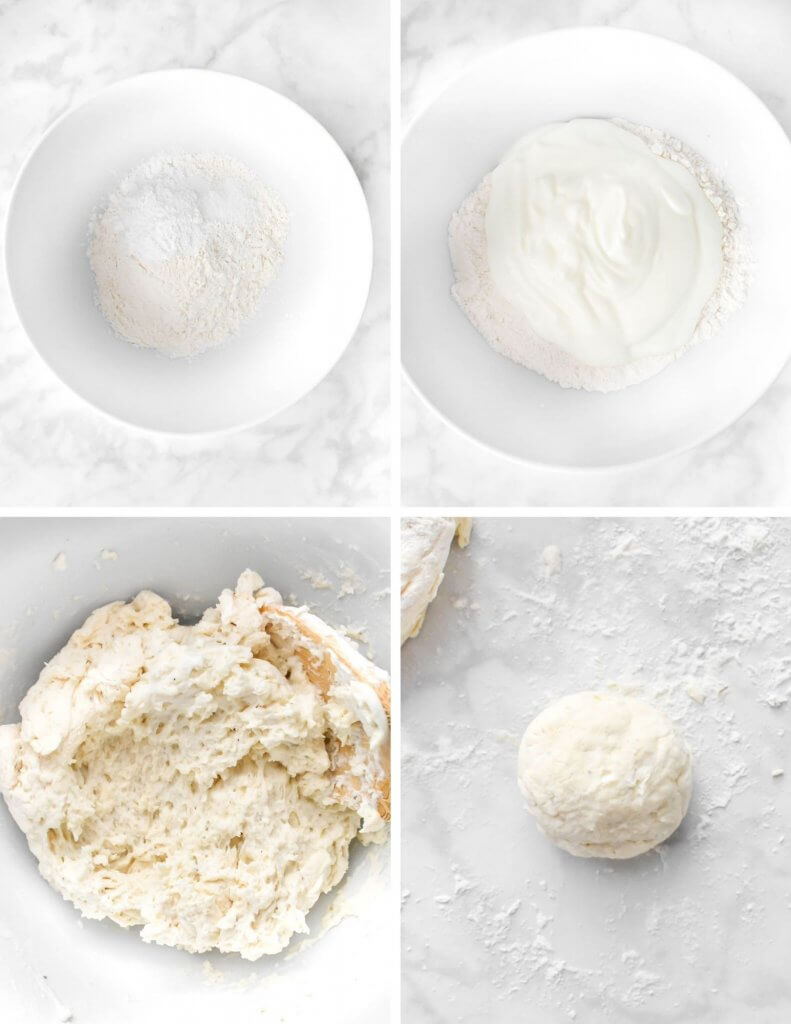
- To make the pizza dough, mix all of the dry ingredients in a bowl. Add the yogurt and use a wooden spoon to mix well. The dough will be shaggy and sticky.
- Transfer to a well floured surface and sprinkle with some flour. Fold the dough in on itself a few times and then form into a ball. Divide the ball into 4 portions and form each into a ball.
- Place each ball onto the parchment paper lined baking sheet (2 to a sheet) and pressing down with your hands, shape them into a circle about 1/4″ thick.
To top the pizzas:
- Spread about 2 tablespoons of pizza sauce onto each crust, leaving 1/4″ border around the circle. Sprinkle with the mozzarella cheese.
- Top the pizzas with the Halloween design you prefer. For the jack o’ lantern design, cut the pepperoni and peppers into triangle shapes. If you are doing the mummy do not top them yet. Instead, in the last 2 minutes of cooking, remove the pizzas from the oven and arrange the olive eyes and strips of cheese and then return to the oven. This will prevent the cheese from over-melting and loosing the shape of the strips.
- Bake the pizzas for about 15-18 minutes or until cooked.
I hope you enjoy these fun Halloween pizzas as much as we do!
-Cathy
You may also like:
If you try and enjoy this recipe, I would love to hear about it! Leave a rating and/or comment below to let me know what you think!
Halloween Pizzas
Ingredients
For the pizza crust:
- 1 1/4 cup flour + more to roll out
- 1 tablespoon dried herbs oregano, basil, or thyme
- 1 1/2 teaspoons baking powder
- 1/2 teaspoon baking soda
- 1/2 teaspoon salt
- 1 cup Greek yogurt or any plain, unsweetened yogurt
For the pizza toppings:
- 1 1/2 cups mozzarella cheese shredded
- 1 slice mozzarella cheese (for each mummy pizza you do)
- 1/2 cup pizza sauce
- pizza toppings (black olives, green pepper, pepperoni)
Instructions
To form the pizza crust:
- Preheat oven to 425F and line 2 baking sheets with parchment paper.
- To make the pizza dough, mix all of the dry ingredients in a bowl. Add the yogurt and use a wooden spoon to mix well. The dough will be shaggy and sticky.
- Transfer to a well floured surface and sprinkle with some flour. Fold the dough in on itself a few times and then form into a ball. Divide the ball into 4 portions and form each into a ball.
- Place each ball onto the parchment paper lined baking sheet (2 to a sheet) and pressing down with your hands, shape them into a circle about 1/4″ thick.
To top the pizzas:
- Spread about 2 tablespoons of pizza sauce onto each crust, leaving 1/4″ border around the circle. Sprinkle with the mozzarella cheese.
- Top the pizzas with the Halloween design you prefer. For the jack o' lantern design, cut the pepperoni and peppers into triangle shapes. If you are doing the mummy do not top them yet. Instead, in the last 2 minutes of cooking, remove the pizzas from the oven and arrange the olive eyes and strips of cheese and then return to the oven. This will prevent the cheese from over-melting and loosing the shape of the strips.
- Bake the pizzas for about 15-18 minutes or until cooked.
Note: Metric ingredient measurements are provided as a courtesy using a third-party calculator and are rounded to the nearest unit. The recipes provided on this site have not been tested with metric measurements and their accuracy cannot be verified.
Nutrition
The nutritional information provided is based on third-party calculations and is an estimate only. Accurate nutritional facts will vary based on the particular brands used, portion sizes, measurement accuracy and more.