This simple, homemade sandwich bread is fluffy, soft and so easy to make! Best of all, it uses simple ingredients making it economical too!
Is there anything better than freshly baked bread? Very little compares to a fresh loaf of delicious homemade bread, right out of the oven. The wonderful aroma fills the kitchen and makes you eager to slice into it.
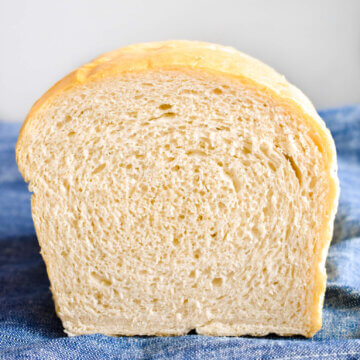
I’m not lying when I tell you that this loaf didn’t last long at all in our house. It was gone far too quick. Embarrassingly quick. But it was too darn good not to devour it. It’s its own fault, really. We’re only human after all.

If this is your first time baking yeast bread, this recipe for everyday sandwich bread is a pretty easy one to get started with. No making your own sourdough starter or anything fancy like that.
This easy sandwich bread is made with simple ingredients. If I can make it, so can you! The hardest part is waiting – waiting for it to rise or waiting for it to cool before slicing it! But if you can find the patience to do that, you’ll have the fluffiest, softest sandwich bread to enjoy.
Toast it with butter, slathered it with peanut butter or Nutella, turned into your sandwich lunch, or better yet, a grilled cheese sandwich. However you eat this perfect white sandwich bread, I am sure it will be gone in no time in your home as it is in ours. Store-bought bread just can’t compete with a homemade loaf!

Ingredients you’ll need to make Homemade Sandwich Bread
- Yeast: active dry yeast
- Warm water: The water should be slightly warm, not hot otherwise it will kill off the yeast. Lukewarm water will give it the best environment to grow.
- Sugar: brown sugar is used in this recipe but you can substitute regular granulated sugar or even honey instead.
- Salt
- Flour: I use all purpose flour but bread flour can be used too.
- Butter
**Note: Ingredient quantities and full instructions are in the recipe card at the end of this post.**
Kitchen Supplies you’ll need to make this easy homemade bread recipe
You don’t need any fancy machines like a bread machine to make this sandwich bread. Really, all you need is a bowl and a loaf pan but, a stand mixer sure does help too.
I use my stand mixer to help form the dough in the beginning but then switch to working by hand to knead it. I have a fear of burning out my stand mixer’s motor and so I’d rather take the therapeutic, stress-relieving route of kneading the bread dough by hand. Maybe its just me but I find it so comforting to knead and play with the dough.
If you don’t have a stand mixer, you can do the whole thing by hand too, so don’t worry.
How to make this sandwich bread recipe
- Activate the yeast. To start, in the bowl of a stand mixer (or a large mixing bowl if you aren’t using a stand mixer), I mix together the yeast, warm water and sugar. Then I let the yeast mixture sit for 5-10 minutes so the yeast can activate and start to bloom. You’ll know its activated when you see it start to bubble up a bit.
- Incorporate the dry ingredients. Then I place the bowl in my mixer and attach the dough hook attachment. I add the flour and salt and let the machine work for a few minutes to bring the dough together.
- Knead it. Then I transfer the dough to a clean, dry work surface. You will need it to be a lightly floured surface. Then knead it for 8-10 minutes. You’ll know its kneaded enough when it feels smooth and elastic.
- First rise. Once it is kneaded, I form it into a ball. Then I grease the bottom and sides of the bowl and place the dough into it. I cover it with plastic wrap and a clean kitchen towel and let the dough rise for an hour or so in the large bowl until it doubles in size in a warm place.
- Second rise. Once its doubled, I punch it down, transfer it to my kitchen counter again and form it into an oval shape. Then I drop it into a greased loaf pan and cover it again. I let the dough rest for a second time for an hour again.
- Bake. Then bake it until the loaf of bread is baked through and golden brown on the outside. Once its cooked, I take it out of the loaf pan and place it cool on a wire rack, brushing it with some melted butter on top and on its sides.
Below is a picture of the steps for making a loaf of sandwich bread. Just look at the how much the bread rises in the bread loaf after its 2nd rise! It poufs up quite a bit!


Storing and freezing sandwich bread
Once baked and cooled completely, transfer your sandwich bread to a plastic bag or airtight container and store it at room temperature for a few days. You can pre-slice your bread but ideally its best to slice as you need it to keep it extra soft.
To freeze sandwich bread, you can place a cooled loaf in a freezer safe bag and freeze it for a couple of months. When you want to enjoy it, simply allow it to defrost at room temperature. When freezing, I recommend pre-slicing your bread so that you can defrost as many slices as you need instead of defrosting the whole loaf.

Ways to use this sandwich bread
There are so many ways to enjoy this bread ranging from breakfast options to snacks or even main meals. Below are just a few of my favorites.
- Breakfast toast slathered with some butter, peanut butter or jam
- French toast
- Grilled cheese
- Sandwiches

Hope you find these tips useful and are well on your way to enjoying a delicious, fresh sandwich loaf. Making your own sandwich bread is easy, affordable, and far more fresh than anything you can buy at the grocery store!
Bon appetit!
-Cathy
If you are looking for other easy bread recipes, check out:
No Knead Bread
Yogurt Flatbread (no yeast required)
Recipe for Easy Dinner Rolls
Homemade Crescent Rolls
Tsoureki – Greek Easter Bread
Homemade Sandwich Bread
Ingredients
- 2 1/4 teaspoons dry active yeast
- 1 3/4 cups water warm
- 2 teaspoons brown sugar
- 1 teaspoon salt
- 3 3/4 cups all purpose flour
- 2 teaspoons butter melted (use vegan butter for a vegan bread)
Instructions
- In a bowl, mix warm water, yeast, and brown sugar. Let it rest for 5-10 minutes to activate the yeast and allow it to bloom.
- In the bowl of a stand mixer with the dough hook attached, pour the yeast mixture, salt, and flour and mix on low speed for approximately 2 minutes, until dough comes together and all of the flour is incorporated.
- Transfer the dough to a clean, dry, lightly floured surface and knead by hand for 8-10 minutes. (You can do this in about 6 minutes in a stand mixer but I fear the motor will burn out in my mixer so I feel more comfortable doing this by hand.) The dough should feel smooth and elastic when you are done. Place the dough in a greased bowl and cover it with plastic wrap and/or a clean dish towel and let it rise for 1 hour or until it doubles in size. Leave the dough to rise undisturbed at room temperature.
- Punch down the dough and form it into an oval shaped loaf. Place the loaf in a greased loaf pan with the seam side down. Let it rise covered at room temperature for 1 hour until it doubles in size.
- Preheat oven to 375F and bake for 25-30 minutes. The loaf should be a nice golden brown. Remove loaf from pan and transfer it to a cooling rack. Brush it with melted butter on its tops and sides.
Note: Metric ingredient measurements are provided as a courtesy using a third-party calculator and are rounded to the nearest unit. The recipes provided on this site have not been tested with metric measurements and their accuracy cannot be verified.
Nutrition
The nutritional information provided is based on third-party calculations and is an estimate only. Accurate nutritional facts will vary based on the particular brands used, portion sizes, measurement accuracy and more.


This was my first time making bread and I love it! The slices are so light and fluffy compared to store loaves, totally worth the time investment. My next day off I’m going to make 2 and that will be our bread for the week!
Thank you so much! I am so glad you loved the recipe!
It came out perfectly! I can’t wait to make more.
I am so glad you enjoyed the recipe!