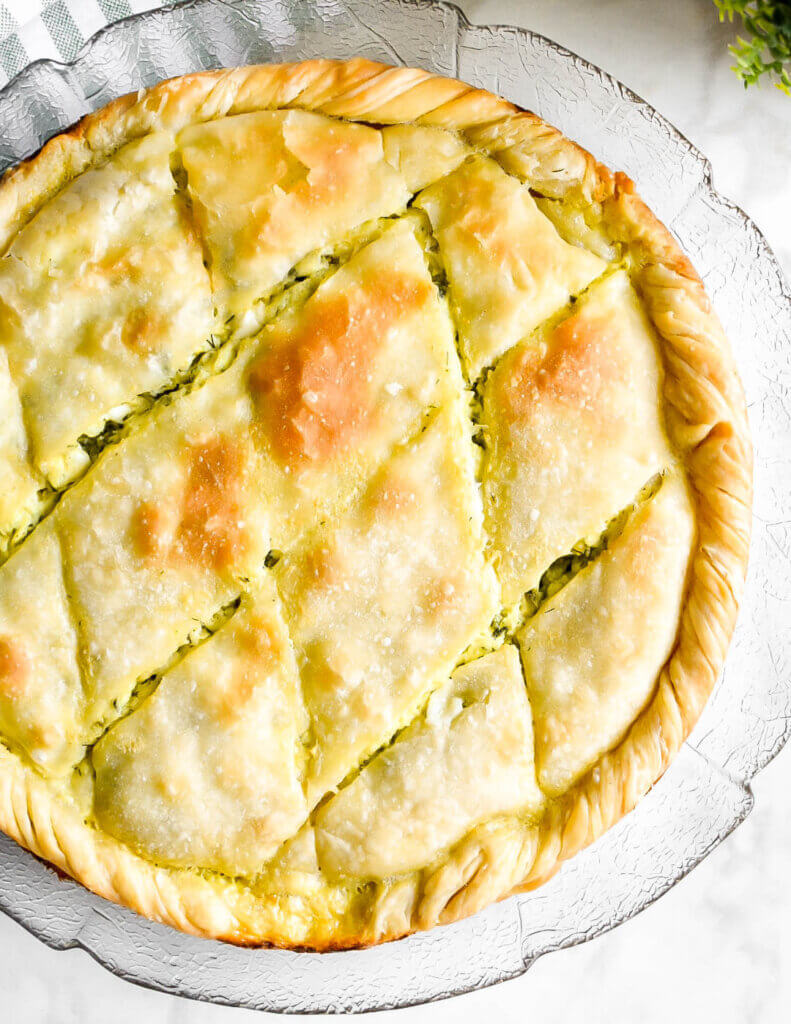
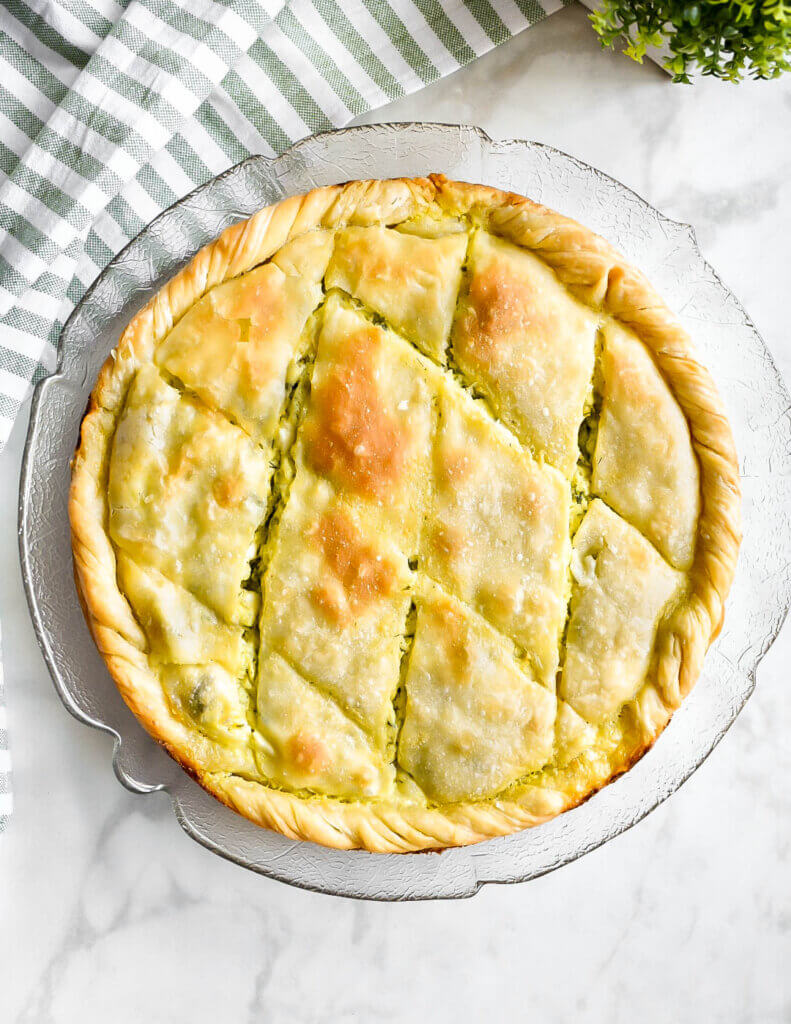
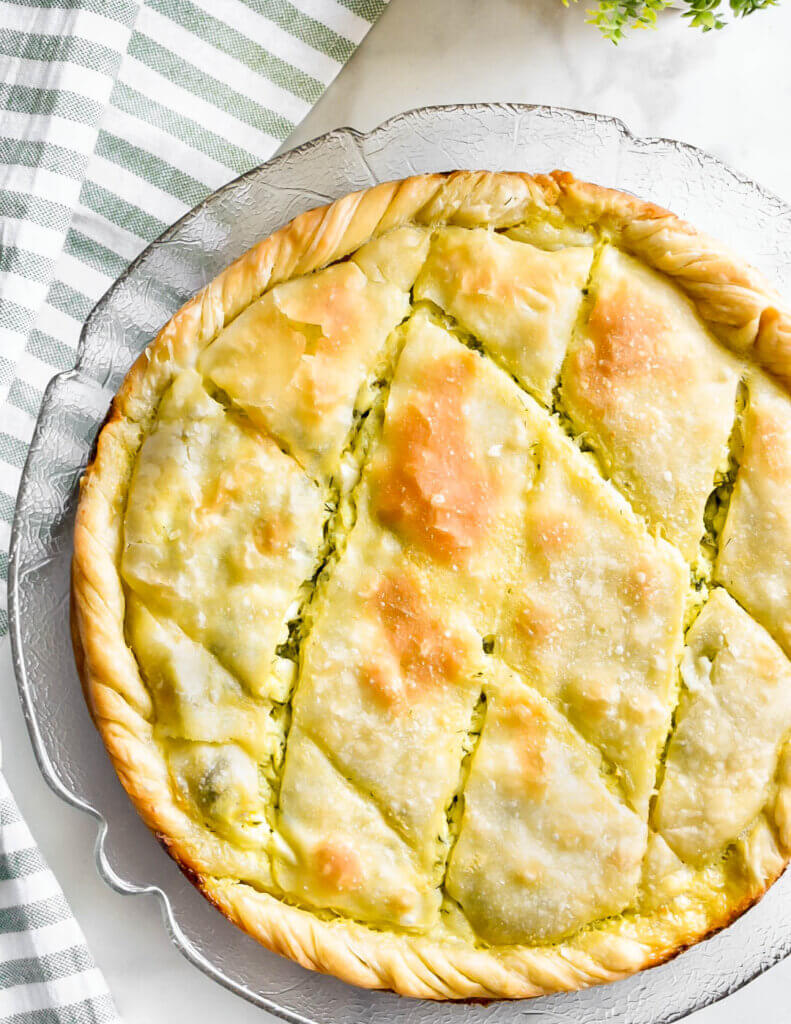
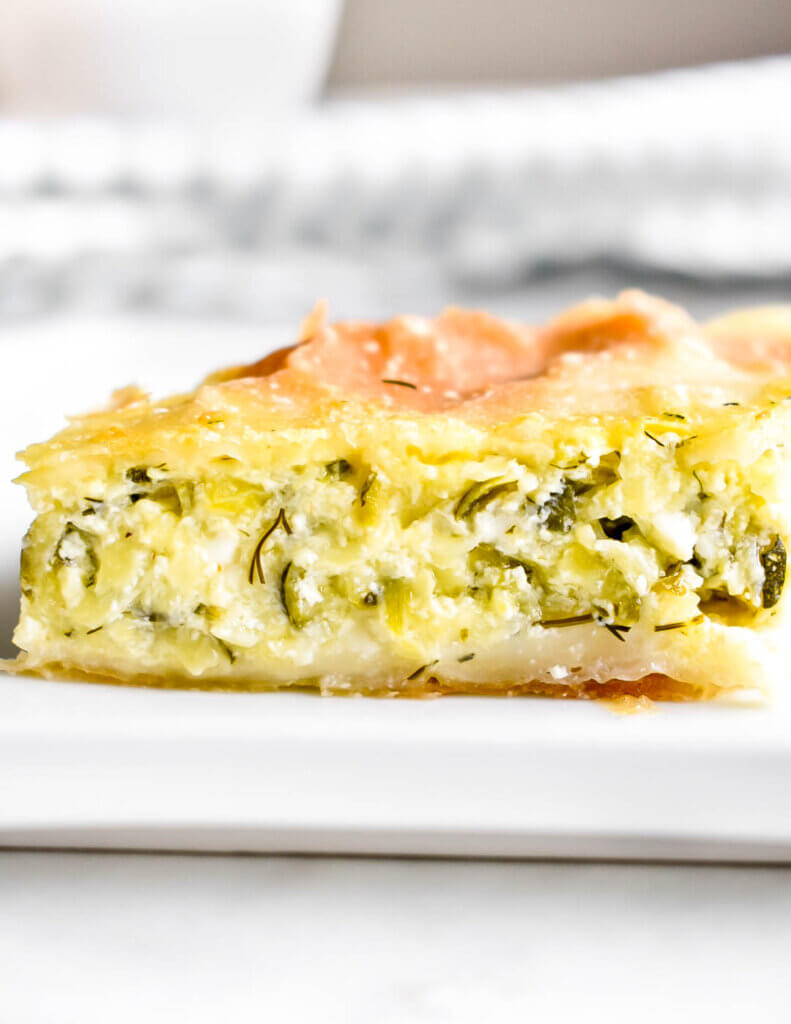
Authentic Kolokithopita or Greek Zucchini Pie is made with a homemade filo crust stuffed with fresh summer zucchini, herbs and feta! Delicious and comforting!
The other day, my mom came over to help me make one of my all-time favourite Greek pitas! Pita, Greek for pie, is so cozy and comforting and can be stuffed with all sorts of fillings like spinach (spanakopita), cheese (tiropita), and zucchini, among many other combinations!
I am a fan of them all! But you guys probably know by now how obsessed I am with zucchini dishes so it should be no surprise that this is one I am crazy about! I love it!
I’ve made this kolokithopita many times before but using store-bought filo. I wanted to make it this time using an authentic country filo which is thicker than the thin sheets you get at the grocery store. I’ve helped my mom make this filo as a little girl but have never attempted to do it all by myself so I invited the expert (my mama) to come show me the ropes!
Together we made the filo, stretched it out and stuffed it full of this delicious zucchini filling. The same filling I have used in previous attempts but with this homemade filo, you guys, it is SO GOOD! So much better!
I took notes as we made it together and made sure to measure out all of the ingredients. My mom, like many other Greek moms I’m sure, tends to make it at all by look and feel and so it was impossible to do this on my own as a recipe didn’t exist.
Well, now it does, folks! And after teaching me the ropes, I can make it all on my own now! And so can you!
Store-bought filo vs. homemade filo
This pie was made with homemade filo which is thicker than store-bought. You require less sheets (4 in total) to do it this way and the end result is a lovely crispy crust that is delicious!
The ‘hardest’ part of this recipe is making the dough. It isn’t difficult and definitely doable though. When I used to make it with my mom we used to form huge circles that were then cut into smaller portions to lay into our baking tray. My mom would use a broom handle to roll it out as the circle was far too large for a rolling pin!
She no longer makes it this way and instead, we divided the dough into 4 smaller portions and used a regular rolling pin instead. It is definitely easier this way!
The basic ingredients for the homemade filo are flour (all purpose), salt, oil, vinegar, and water.
If you want to skip it and use store-bought dough instead, go right ahead! Just use more thin sheets of filo than I do here. You will likely need 10 sheets of filo. For steps on how to do this, you can check out my Spanakopita recipe.
Ingredients in kolokithopita filling:
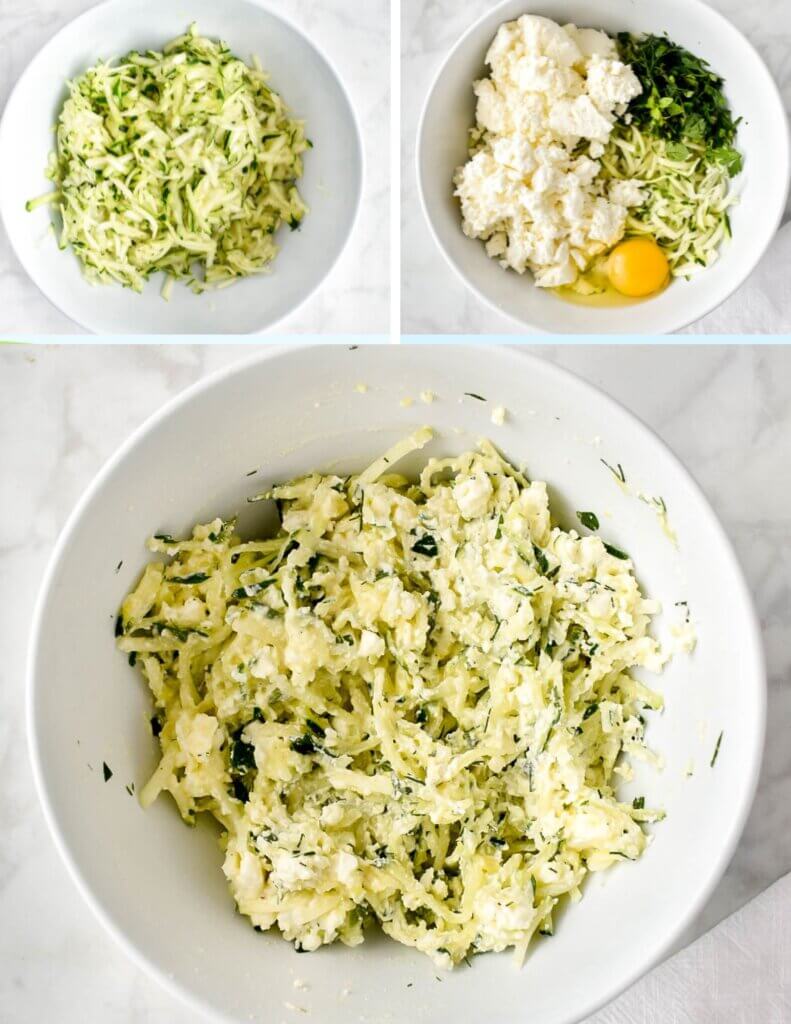
- Zucchini: shredded
- Cheese: feta and ricotta
- Herbs: parsley, dill, oregano
- Egg
- Seasoning: salt and pepper
- Semolina: used between the filling and filo layers to absorb the moisture and keep the filo flaky.
Ingredients for homemade filo dough:
- Flour (all purpose)
- Salt
- White wine vinegar (or white vinegar)
- Water
- Olive oil
Please note: For ingredient quantities and full instructions, please see the recipe card at the end of this post.
How to make Kolokithopita (Greek Zucchini Pie)
Making kolokithopita essentially comes down to 3 steps. While the recipe card has many more steps, they essentially fall under the 3 basic groups. Don’t be overwhelmed by the number of steps, it really is easy to do. The 3 basic steps are:
- Make the kolokithopita filling.
- Make the filo dough.
- Assemble and bake.
Make the kolokithopita filling:
- Shred zucchini. Sprinkle it with the salt and let it sit for 20 minutes.
- Place the zucchini in a cheese cloth and squeeze out excess water. Add it to a large bowl.
- Add the remaining filling ingredients and mix well.
Make the filo dough:
- Preheat oven at 375F.
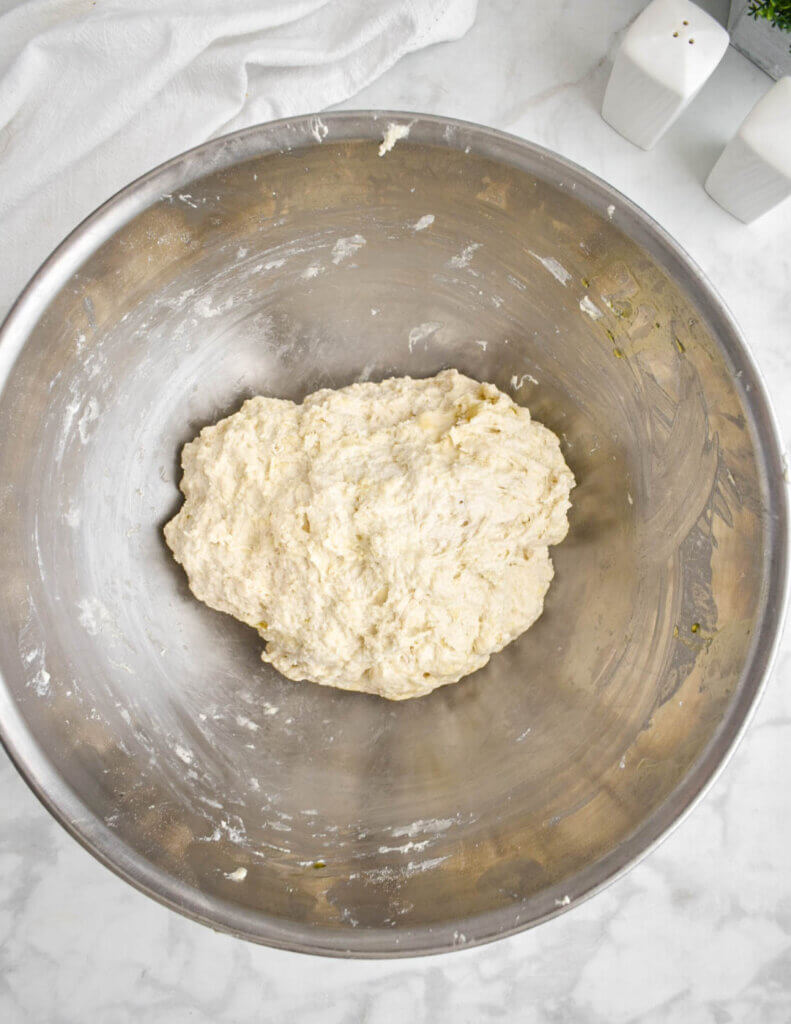
- To a large bowl, add the flour, salt, vinegar, and water. Using your hands, mix to combine ingredients and then add the olive oil. Knead by hand until the dough comes together. It will look shaggy but be pliable.
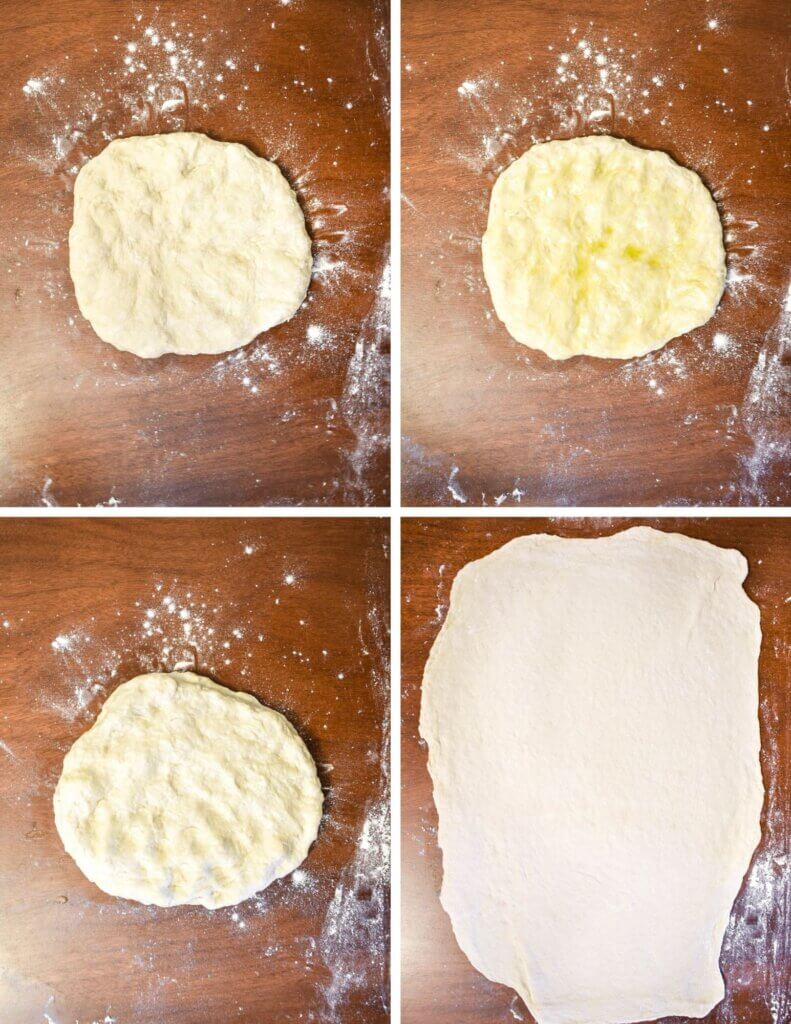
- Divide the filo dough into 4 equal sections. On a clean, floured surface, form each into a ball and press them down to form disks.
- Take one disk and drizzle it with a teaspoon of olive oil and then add a second disk over top of it. Using a rolling pin, roll the stacked filo disks out into a circle (slightly larger than the pan you are using). Sprinkle with more flour as needed to prevent it sticking to rolling pan or table.
- Repeat this with the other 2 disks so that you end up with 2 large circle filo sheets.
Assemble and bake:
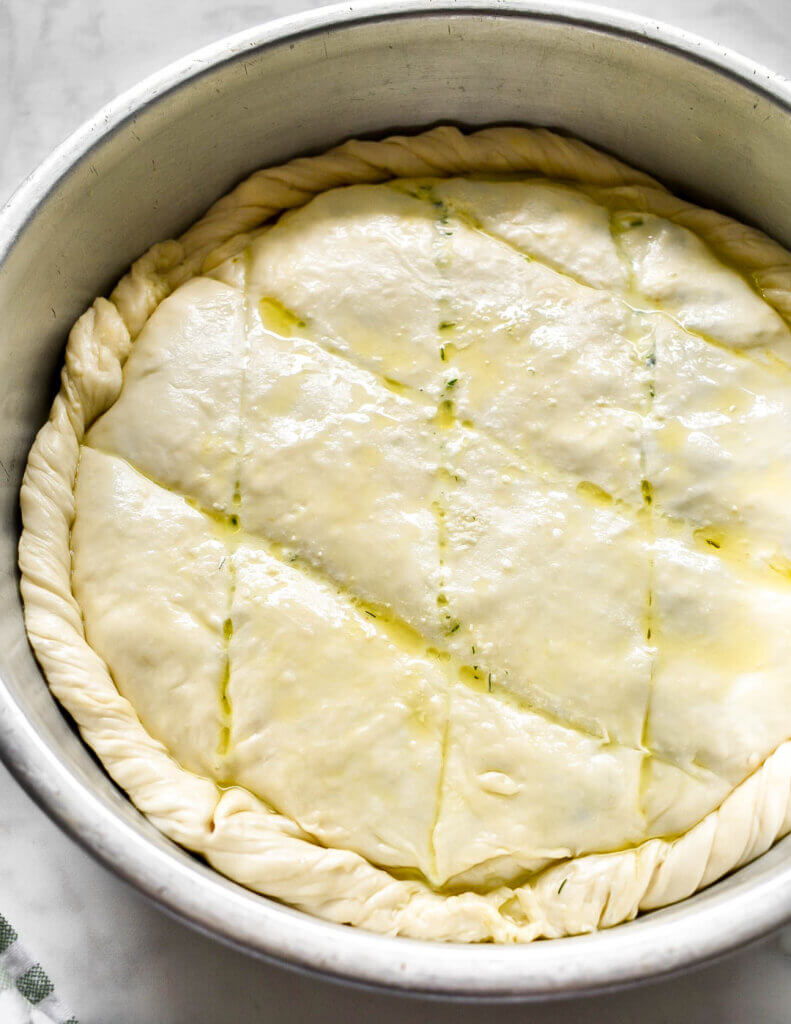
- Grease the bottom of the baking pan with olive oil. Place a sheet of filo on the bottom of the pan The edges of the filo will hang over the pan. That is okay. Sprinkle the filo with 1 tablespoon of semolina. The semolina will help absorb some moisture and keep the filo flaky.
- Spread the zucchini filling evenly over the filo in the baking dish. Sprinkle the zucchini mixture with the remaining semolina powder.
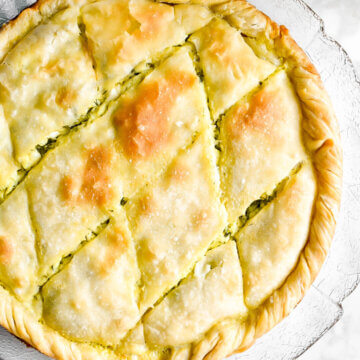
- Place the pan on top of the leftover filo sheet to cut out a circle approximately the same size as the pan. Add the filo over top of the zucchini mixture.
- Trim the excess dough by running the back of a knife along the pan lip like you would pie dough. Fold over the edge of the excess bottom filo layers over the top layers.
- Brush olive oil over the filo and then gently score slices, but do not cut all the way through. (Think of it as if you are making dashed lines for each portion. After it is baked you will fully slice it but for now you are only scoring it. I use the tip of a knife and gently make small cuts to form the rough shape of each slice. Do not run your knife completely across the filo sheets to make full slices. If you run a knife through and completely cut each slice, the filo will begin to shrink into itself so avoid this.)
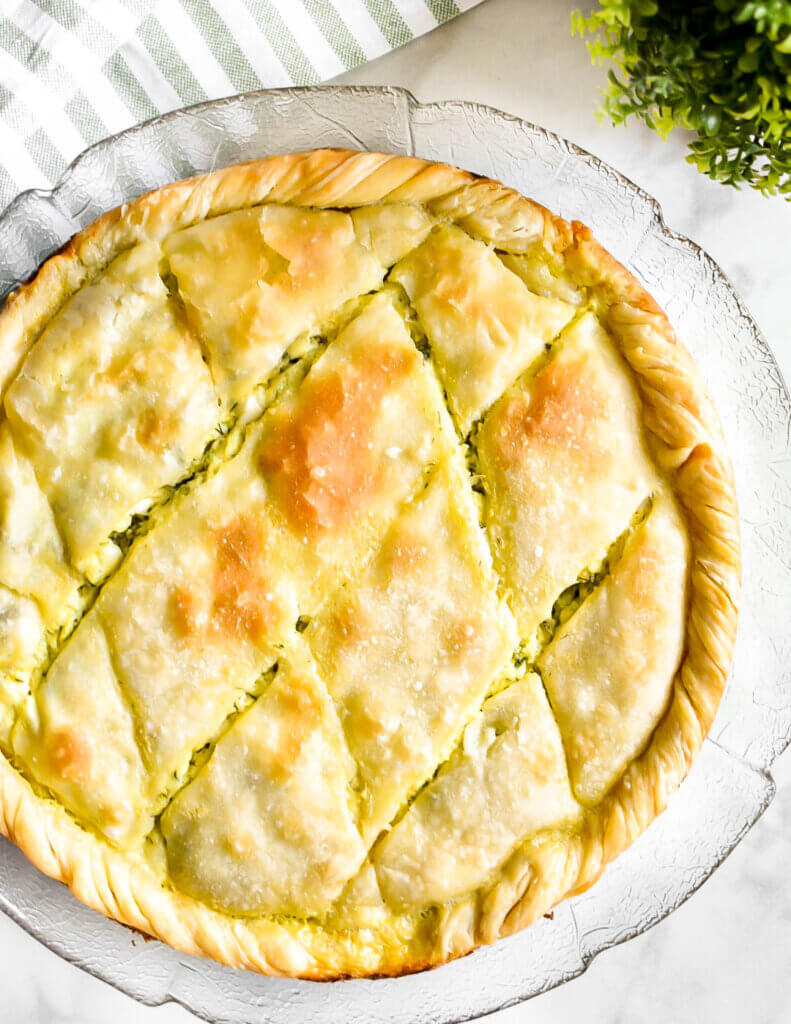
- Bake in the oven for 50-55 minutes or until the the filo turns a nice golden colour.
What to serve with kolokithopita:
Kolokithopita makes a great appetizer or snack and can be served on its own. It is also great as a lunch of dinner served with a salad. My favourites salad to enjoy with kolokithopita are Traditional Greek Salad, Radish Cucumber Salad or my Cucumber Feta Salad.
I hope you enjoy this recipe as much as I do!
-Cathy
You may also like:
Spanakopita
Prasopita (Greek Leek Pie)
Hortopita (Greek Mixed Greens Pita)
Kolokithopita (Greek Zucchini Pie)
Ingredients
For the filo dough
- 6 cups flour (all purpose)
- 1/4 teaspoon salt
- 2 tablespoons white wine vinegar (or white vinegar)
- 2 1/2 cup water
- 2 tablespoons olive oil + more for drizzling between layers and to grease pan
Filling
- 3 cups zucchini shredded
- 1/4 teaspoon salt
- 3/4 cups feta
- 1/2 cup ricotta
- 2 tablespoons fresh parsley chopped
- 2 tablespoons fresh dill chopped
- 1 tablespoon fresh oregano chopped
- 1/8 teaspoon pepper
- 1 egg
Other ingredients
- 2 tablespoons semolina
Instructions
Make the filling:
- Shred zucchini. Sprinkle it with the salt and let it sit for 20 minutes.
- Place the zucchini in a cheese cloth and squeeze out excess water. Add it to a large bowl.
- Add the remaining filling ingredients and mix well.
Make the filo dough:
- Preheat oven at 375F.
- To a large bowl, add the flour, salt, vinegar, and water. Using your hands, mix to combine ingredients and then add the olive oil. Knead by hand until the dough comes together. It will look shaggy but be pliable.
- Divide the filo dough into 4 equal sections. On a clean, floured surface, form each into a ball and press them down to form disks.
- Take one disk and drizzle it with a teaspoon of olive oil and then add a second disk over top of it. Using a rolling pin, roll the stacked filo disks out into a circle (slightly larger than the pan you are using). Sprinkle with more flour as needed to prevent it sticking to rolling pan or table.
- Repeat this with the other 2 disks so that you end up with 2 large circle filo sheets.
Assemble and bake:
- Grease the bottom of the baking pan with olive oil. Place a sheet of filo on the bottom of the pan The edges of the filo will hang over the pan. That is okay. Sprinkle the filo with 1 tablespoon of semolina. The semolina will help absorb some moisture and keep the filo flaky.
- Spread the zucchini filling evenly over the filo in the baking dish. Sprinkle the zucchini mixture with the remaining semolina powder.
- Place the pan on top of the leftover filo sheet to cut out a circle approximately the same size as the pan. Add the filo over top of the zucchini mixture.
- Trim the excess dough by running the back of a knife along the pan lip like you would pie dough. Fold over the edge of the excess bottom filo layers over the top layers.
- Brush olive oil over the filo and then gently score slices, but do not cut all the way through. (Think of it as if you are making dashed lines for each portion. After it is baked you will fully slice it but for now you are only scoring it. I use the tip of a knife and gently make small cuts to form the rough shape of each slice. Do not run your knife completely across the filo sheets to make full slices. If you run a knife through and completely cut each slice, the filo will begin to shrink into itself so avoid this.)
- Bake in the oven for 50-55 minutes or until the the filo turns a nice golden colour.
Note: Metric ingredient measurements are provided as a courtesy using a third-party calculator and are rounded to the nearest unit. The recipes provided on this site have not been tested with metric measurements and their accuracy cannot be verified.
Nutrition
The nutritional information provided is based on third-party calculations and is an estimate only. Accurate nutritional facts will vary based on the particular brands used, portion sizes, measurement accuracy and more.


What size pan did you use? A round 12″ or 14″?
14 inches, I believe.
The pan looks deep, like a springform rather than a pie dish. Am I seeing this correctly?
It’s a baking pan, not a pie dish and so it is deeper than a pie dish. The kolokithopita doesn’t go all the way up it and it isn’t very thick so you don’t need to use a deep dish.